Neo 2 for Low-Light Construction Site Spraying
Neo 2 for Low-Light Construction Site Spraying: A Practical Workflow Grounded in Aerial Mapping Discipline
META: A field-focused Neo 2 tutorial for low-light construction site spraying, with workflow tips tied to digital aerial photogrammetry standards, image handling, obstacle awareness, subject tracking, and antenna positioning for stronger signal range.
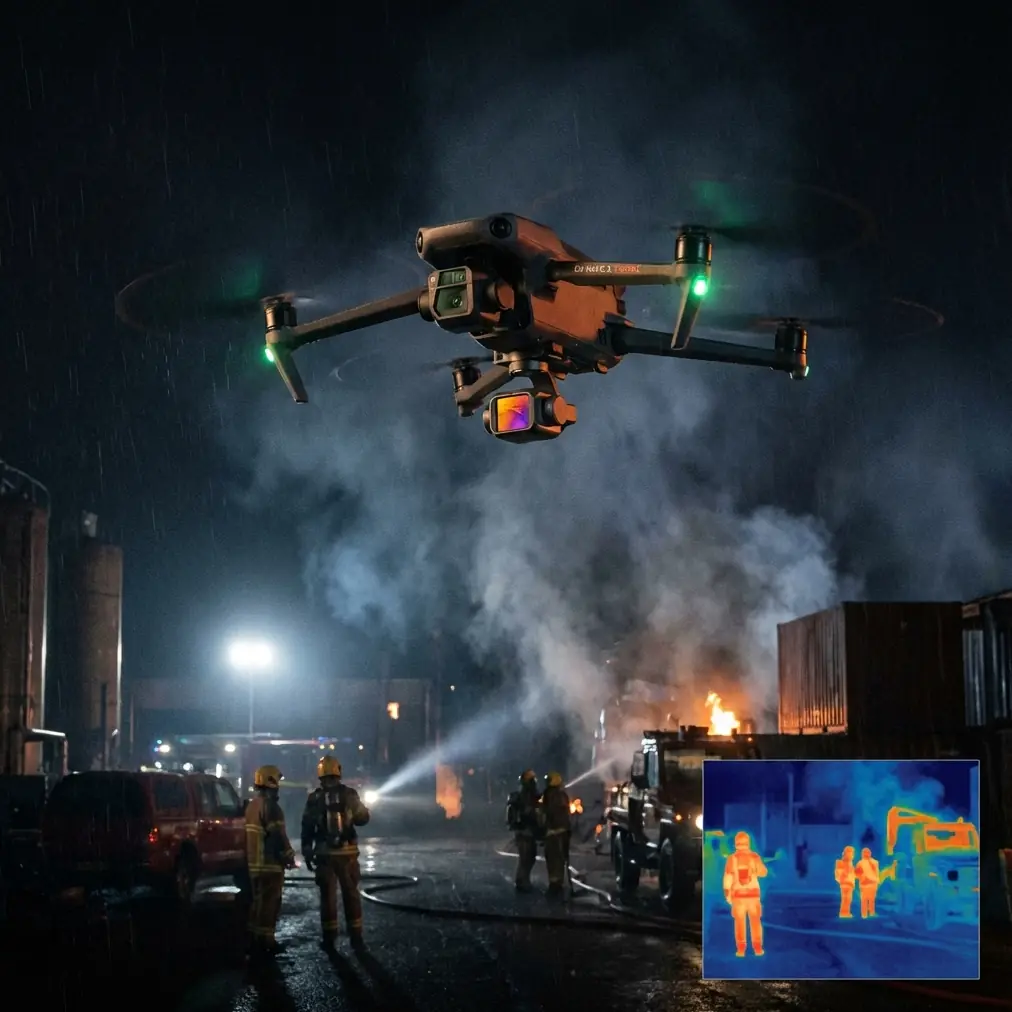
Low-light work on construction sites creates a strange mix of urgency and precision. Dust hangs in the air. Steel reflects stray light. Wet surfaces flatten depth cues. Crews want the spraying done before the next phase begins, but visibility is already slipping.
That is exactly where many operators make the wrong assumption about a platform like Neo 2. They treat it as if low light is mainly a camera problem. It is not. On a construction site, low-light spraying is a workflow problem first: route planning, visual consistency, signal discipline, obstacle management, and recordkeeping all become tighter when the sun drops.
A useful way to think about Neo 2 in this scenario is not as a gadget with a few smart flight modes, but as a compact aerial work tool that benefits from the same structured mindset found in formal low-altitude photogrammetry practice. One reference point for that mindset is the Chinese standard CH/Z 3003-2010, 低空数字航空摄影测量内业规范, a low-altitude digital aerial photogrammetry office-processing specification proposed under the national surveying framework. Even though that document is not a spraying manual, the process logic behind it matters. It emphasizes method requirements, orthophoto production, image correction, color balancing, mosaicking, finishing, inspection, and acceptance. Those ideas translate surprisingly well to construction spraying in fading light.
Why a mapping standard matters when your job is spraying
At first glance, aerial photogrammetry and site spraying seem like different worlds. One is about measurement products such as DEMs and orthophotos. The other is about applying material accurately and safely. But in the field, both depend on repeatable aerial execution.
The reference document explicitly includes sections for “作业方法及要求”—work methods and requirements—and for digital orthophoto production, including correction, color balancing, mosaicking, and image processing. That is not just office language. Operationally, it tells you something very practical: if your aerial output needs to be trusted later, then your flight path, image consistency, and post-flight verification cannot be casual.
For low-light spraying on a construction site, that translates into three hard rules:
- Fly a repeatable pattern, not an improvised one.
- Capture reviewable imagery before, during, and after the spraying pass.
- Verify coverage with the same discipline you would use for a deliverable image product.
If you skip those steps, low light will expose the weakness immediately. You may still complete the job, but you will struggle to prove where material was applied, whether overlap was adequate, or whether environmental conditions degraded the result.
Start with the site like a surveyor, not like a hobby pilot
Before the first spray pass, treat the site as a controlled work area. Construction sites are cluttered by nature: rebar bundles, temporary fencing, cranes, scaffolding, uneven spoil piles, reflective water, and partially enclosed structures. In daylight, an experienced operator can read those hazards quickly. In low light, contrast drops and relative distances become harder to judge.
This is where Neo 2’s obstacle avoidance becomes less of a convenience feature and more of a risk reducer. It does not replace visual judgment, but it does add another layer when site geometry gets confusing. The key is to understand what obstacle systems can and cannot do in dim conditions. They help most when your route has already been simplified. They help least when you are trying to improvise around chaotic structures at the last second.
So the workflow should begin with a short reconnaissance loop. Use the Neo 2 to establish:
- likely spray corridors
- vertical obstructions
- reflective surfaces
- dust or mist drift zones
- crew movement areas
- signal dead spots near concrete walls or steel assemblies
That reconnaissance pass should be recorded. If you later need to confirm where conditions changed, that footage becomes part of your job record.
This is where the document’s emphasis on inspection and acceptance becomes relevant. The standard includes a section for 检查验收, inspection and acceptance. For spraying, the equivalent is simple: do not rely on memory. Build a verifiable workflow. Low light makes visual assumptions unreliable.
Use image discipline even if your end product is not an orthophoto
The reference also points to digital orthophoto image production and specifically mentions image correction, color balancing, mosaicking, and image processing. On paper, that belongs to mapping. In practice, it gives spraying operators a useful lesson: image consistency matters when you review work under uneven light.
Construction sites at dusk are notorious for mixed color temperatures. Flood lamps, vehicle headlights, sodium fixtures, concrete glare, and shadowed corners all distort what your camera is showing. If you intend to use captured imagery to confirm spray coverage, compare treated versus untreated zones, or brief a project manager, then inconsistent exposure and color will make the footage harder to trust.
That is why Neo 2 settings should be chosen for reviewability, not just visual appeal.
If your platform setup supports D-Log, use it when the site has harsh bright points and deep shadows in the same frame. D-Log can preserve more grading flexibility later, which helps when you need to evaluate the surface condition instead of simply making it look dramatic. If you are shooting quick reference clips for immediate field decisions, a more direct profile may be faster. The point is not the mode itself. The point is that low-light spraying requires intentional image handling.
A small but important distinction: for a spray job, cinematic footage is secondary. Clear evidence wins.
Subject tracking is useful, but only in the right phase of the job
The product context around Neo 2 often brings up Subject tracking and ActiveTrack. On construction sites, these features can be genuinely useful, but not for every moment.
For instance, during pre-spray setup, tracking a moving utility vehicle or a site supervisor walking the target corridor can help you quickly document the exact area to be treated. That creates a visual reference that is much easier to revisit later than a verbal description. It can also help when you need a clean briefing clip for remote stakeholders.
During the actual spraying pass, though, your primary concern is coverage consistency and obstacle separation. That is not the time to get creative with autonomous motion unless the route and conditions are very well controlled.
Think of ActiveTrack as a documentation tool first and a flight convenience second. In low light, that distinction matters because the more autonomous complexity you introduce near structures, the narrower your safety margin becomes.
QuickShots and Hyperlapse are not fluff if you use them correctly
A lot of operators dismiss QuickShots and Hyperlapse as marketing extras. On a construction site, that is too simplistic.
A short automated reveal clip before spraying can document the starting condition of an area better than a few stills taken from ground level. A Hyperlapse sequence from a fixed and safe perspective can compress the operation into a review asset that project managers actually watch. That matters because spraying work often needs coordination with waterproofing, dust suppression, curing, or coating schedules. Fast visual records improve communication.
The trick is restraint. Use these modes only when they serve documentation. Do not use them to complicate a low-light operational window.
Antenna positioning advice for maximum range
Now to the practical point many operators overlook: antenna positioning.
Signal quality on construction sites is often worse than expected, even at short distances. Steel framing, temporary structures, containers, concrete cores, and site equipment all interfere with clean transmission paths. Low-light work often happens when fewer people are around, which can make you feel comfortable pushing farther. That is exactly when poor controller posture starts costing you.
Here is the field rule: point the flat face of the antenna array toward the aircraft, not the tips directly at it. Many pilots instinctively “aim” the antenna ends at the drone. That usually reduces effective link quality. Keep the controller oriented so the broadside of the transmission pattern faces Neo 2 as it moves across the work zone.
A few more habits make a real difference:
- Stand where you have the clearest line of sight over fencing and material stacks.
- Avoid tucking yourself beside a site office container or reinforced wall.
- Reorient your body as the drone changes direction so the controller remains aligned.
- If the route runs behind structures, reposition yourself before the aircraft reaches the obstructed zone.
- Do not let a parked truck become the object between you and the drone.
Operational significance: better antenna alignment does not just extend range. On low-light spray jobs, it preserves command stability exactly when visual cues are weaker. That is what matters. Maximum range is less about distance bragging rights and more about reducing control degradation in a cluttered RF environment.
If you are planning a tricky site setup and want a second opinion on signal positioning or route design, you can message a drone workflow specialist here.
Build your spraying pass like a coverage grid
One of the most interesting clues in the reference material is Appendix A, which covers grid size estimation for digital elevation model feature point matching. Even though this is a mapping concept, the operational lesson is excellent: grid logic improves consistency.
For spraying, think in lanes and overlap rather than vague sweeping movement. Divide the work area into a simple coverage grid. That could be by slab section, facade zone, trench edge, or haul-road strip. In low light, this matters even more because your eyes are less able to detect missed segments in real time.
A grid-based pass gives you:
- consistent spray spacing
- easier post-flight verification
- simpler rework identification
- cleaner crew handoff
- less over-application from uncertain overlap
This is where many compact-drone operators underperform. They trust intuition instead of structure. The photogrammetry world learned long ago that structure beats memory. Spraying crews can borrow that lesson directly.
A practical low-light Neo 2 workflow
Here is the approach I recommend for a small to mid-sized construction spraying task in fading light.
1. Define the treatment boundary before takeoff
Mark the exact surfaces or corridors to be sprayed. Confirm no-go zones, crew positions, and nearby obstacles. If the site is changing fast, do not trust old notes.
2. Run a short reconnaissance flight
Use a controlled loop at a safe height to inspect lighting conditions, reflective hazards, and airflow behavior. Record the pass.
3. Establish your signal position
Choose the controller location with the cleanest line of sight. Set your antenna orientation correctly before beginning the mission, and plan where you will physically move if the route extends behind obstructions.
4. Capture baseline imagery
Take stills or short clips of the untreated area. If the lighting is uneven, use settings that preserve review value rather than social-media punch.
5. Fly a grid-style spray pattern
Use straight, repeatable lanes with deliberate overlap. Keep speed conservative enough that you can maintain visual confidence near obstacles.
6. Use obstacle avoidance as a buffer, not as a substitute
If the environment is tight, reduce route complexity. Let obstacle sensing backstop your plan, not define it.
7. Document progress intelligently
If a moving crew element or vehicle defines the work zone, Subject tracking or ActiveTrack may help document location changes. For overview communication, a restrained QuickShot or Hyperlapse can be useful after the operationally sensitive phase is complete.
8. Conduct a post-pass verification loop
This is the spraying equivalent of inspection and acceptance. Review the treated surface from the same general angle used during baseline capture so differences are easier to see.
Why this approach holds up better than a casual “spray and go” method
Because low-light site work punishes inconsistency.
The reference standard’s focus on process, correction, image handling, and acceptance is a reminder that aerial operations become dependable only when outputs can be checked. In the mapping context, the result might be a B-class digital orthophoto. In your construction context, the result is a treated surface with documented coverage and a clear operational record.
Different output. Same discipline.
That is also why Neo 2’s smarter features should be judged by whether they reduce uncertainty. Obstacle avoidance reduces collision risk in visually messy conditions. ActiveTrack and Subject tracking help preserve context when the work zone shifts. D-Log can improve image review when contrast is difficult. QuickShots and Hyperlapse can turn a forgettable operation log into something the project team can actually use. And proper antenna positioning keeps the control link stable when structures try to block it.
None of those features matter much in isolation. Together, under a disciplined workflow, they make low-light spraying more controlled and more defensible.
If you are flying Neo 2 on construction jobs, that is the standard worth chasing: not flashy footage, not maximum speed, and definitely not improvisation after sunset. Precision under imperfect visibility is the real benchmark.
Ready for your own Neo 2? Contact our team for expert consultation.