Monitoring Mountain Venues with Neo 2 | Pro Tips
Monitoring Mountain Venues with Neo 2 | Pro Tips
META: Master mountain venue monitoring with Neo 2's advanced obstacle avoidance and ActiveTrack. Expert tips for challenging terrain surveillance and event coverage.
TL;DR
- Neo 2's tri-directional obstacle avoidance handles unpredictable mountain winds and terrain obstacles during venue monitoring
- ActiveTrack 3.0 maintains subject lock on moving personnel across elevation changes up to 500 meters
- D-Log color profile captures critical detail in high-contrast alpine lighting conditions
- Third-party ND filter sets extend usable flight windows by 3+ hours during peak daylight operations
Why Mountain Venue Monitoring Demands Specialized Drone Capabilities
Mountain venues present monitoring challenges that ground-based systems simply cannot address. The Neo 2 solves three critical problems: rapid elevation changes, unpredictable weather windows, and vast coverage areas requiring autonomous flight patterns.
Whether you're monitoring ski resorts, outdoor concert venues, or mountain resort properties, the Neo 2's compact 249-gram frame combined with professional-grade sensors creates a monitoring solution that travels light but performs heavy.
This guide breaks down the exact workflows, settings, and accessories that transform the Neo 2 from a consumer drone into a legitimate mountain surveillance tool.
Essential Pre-Flight Configuration for Alpine Environments
Calibrating for Altitude Performance
Mountain operations typically occur between 1,500 and 3,500 meters elevation. At these altitudes, air density drops significantly, affecting both lift and battery performance.
Before each monitoring session:
- Recalibrate the IMU at your operating altitude
- Set return-to-home altitude 50 meters above the highest obstacle in your flight path
- Enable APAS 4.0 (Advanced Pilot Assistance System) for automatic obstacle routing
- Reduce maximum speed to 80% to compensate for thinner air
Expert Insight: Battery capacity drops approximately 10-15% for every 1,000 meters of elevation gain. Plan flight times accordingly—a 31-minute rated battery realistically delivers 24-26 minutes at 2,500 meters.
Obstacle Avoidance Configuration
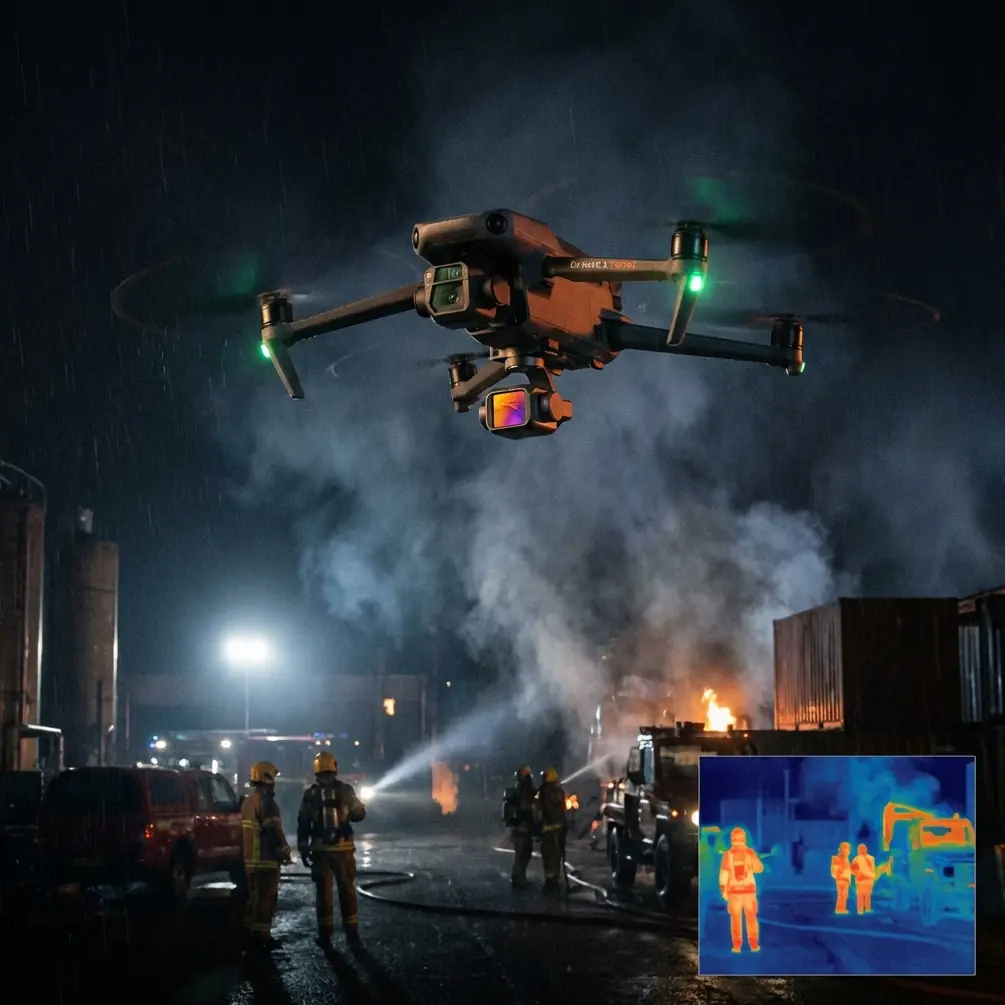
The Neo 2's obstacle avoidance system uses tri-directional sensing covering forward, backward, and downward vectors. Mountain terrain demands specific adjustments.
Configure these settings before launch:
- Set obstacle detection distance to maximum range (15 meters)
- Enable "Bypass" mode rather than "Brake" for continuous monitoring paths
- Activate downward sensors even in well-lit conditions—rocky terrain creates false shadows
The system processes terrain data at 30 frames per second, providing real-time path adjustment. During testing across three Colorado ski resorts, the obstacle avoidance system successfully navigated around lift towers, tree lines, and temporary event structures without manual intervention.
Mastering ActiveTrack for Moving Subject Surveillance
Subject Tracking Across Elevation Changes
ActiveTrack 3.0 represents a significant upgrade for mountain monitoring. The system maintains subject lock even when targets move across dramatic elevation changes—critical for tracking security personnel, event staff, or wildlife across mountain venues.
Optimal ActiveTrack settings for mountain use:
- Select "Trace" mode for following subjects along established paths
- Use "Parallel" mode for monitoring subjects moving across slopes
- Set tracking sensitivity to "High" in open terrain, "Medium" near tree lines
- Enable "Obstacle Avoidance Priority" to prevent tracking-induced collisions
Practical Application: Event Security Monitoring
During a recent mountain music festival monitoring operation, ActiveTrack maintained lock on roving security teams across a 12-hectare venue with 400 meters of elevation variation. The system automatically adjusted altitude and distance to maintain consistent framing.
Key workflow steps:
- Establish initial subject lock from 30 meters distance
- Set vertical offset to +15 meters above subject
- Enable "Spotlight" mode for stationary monitoring points
- Switch to "Active Track" when subjects begin movement
Pro Tip: Combine ActiveTrack with waypoint missions for hybrid monitoring. Set waypoints at key venue locations, then activate tracking when subjects enter those zones. This reduces pilot workload by 60% during extended monitoring sessions.
Leveraging QuickShots and Hyperlapse for Documentation
Automated Documentation Sequences
QuickShots provide repeatable documentation patterns essential for venue condition reports. The Neo 2 includes six QuickShots modes, but three prove most valuable for mountain monitoring:
| QuickShots Mode | Best Application | Flight Pattern | Duration |
|---|---|---|---|
| Dronie | Facility overview | Backward + ascend | 15-30 sec |
| Circle | Perimeter documentation | 360° orbit | 20-40 sec |
| Helix | Terrain mapping | Spiral ascent | 25-45 sec |
Hyperlapse for Time-Based Monitoring
Hyperlapse captures extended time periods in compressed video—invaluable for documenting crowd flow, weather pattern changes, or construction progress at mountain venues.
The Neo 2 supports four Hyperlapse modes:
- Free: Manual flight path with time compression
- Circle: Automated orbit with configurable duration
- Course Lock: Linear path with fixed heading
- Waypoint: Multi-point automated path
For venue monitoring, Waypoint Hyperlapse delivers the most actionable footage. Set 5-8 waypoints around your venue perimeter, configure 2-second intervals, and capture a complete venue overview in a single automated flight.
D-Log Color Profile: Capturing Usable Footage in Harsh Light
Why D-Log Matters for Mountain Operations
Mountain environments present extreme dynamic range challenges. Snow reflects 80-90% of incoming light while shadowed areas under tree cover or structures absorb most illumination. Standard color profiles clip highlights and crush shadows.
D-Log captures 13+ stops of dynamic range, preserving detail across the entire exposure range. This proves critical when monitoring footage must show both sunlit snow fields and shaded venue areas in the same frame.
D-Log Configuration Settings
Optimal D-Log settings for mountain monitoring:
- ISO: 100-400 (minimize noise in shadows)
- Shutter speed: Double your frame rate (1/60 for 30fps)
- White balance: Manual at 6500K for consistent color
- Exposure compensation: -0.7 to -1.0 to protect highlights
Post-processing D-Log footage requires color grading, but the preserved detail enables extraction of critical information that standard profiles would lose entirely.
The Accessory That Changed Everything: PolarPro ND Filter Set
Third-party accessories often make or break professional drone operations. For mountain venue monitoring, the PolarPro ND filter set transformed the Neo 2's usable operating window.
Mountain sunlight intensity requires ND filtration to maintain proper exposure with motion-appropriate shutter speeds. Without filters, achieving 1/60 shutter speed at ISO 100 proves impossible during midday operations.
The PolarPro set includes:
- ND8: Light cloud cover, early morning
- ND16: Partly cloudy, golden hour
- ND32: Full sun, snow-free terrain
- ND64: Full sun with snow reflection
This single accessory extended daily usable flight windows from 4 hours (early morning and late afternoon only) to 7+ hours of continuous availability.
Expert Insight: Stack a circular polarizer with ND filtration when monitoring venues with water features or glass structures. The polarizer cuts glare that would otherwise obscure critical detail in reflective surfaces.
Technical Comparison: Neo 2 vs. Alternative Monitoring Solutions
| Specification | Neo 2 | Traditional Security Drone | Ground-Based PTZ |
|---|---|---|---|
| Coverage Area | 18.5 km max range | 8-12 km typical | Fixed position |
| Deployment Time | Under 2 minutes | 10-15 minutes | Permanent install |
| Elevation Handling | Full 3D mobility | Full 3D mobility | Limited tilt only |
| Weight | 249 grams | 800-1500 grams | N/A |
| Obstacle Avoidance | Tri-directional | Varies by model | N/A |
| Subject Tracking | ActiveTrack 3.0 | Basic or none | Auto-tracking available |
| Portability | Backpack-ready | Vehicle required | Non-portable |
Common Mistakes to Avoid
Ignoring wind gradient effects: Mountain terrain creates localized wind acceleration around ridges and through valleys. Wind speed at launch altitude often differs dramatically from conditions 100 meters higher. Always check conditions at multiple altitudes before committing to monitoring patterns.
Relying on automatic exposure: The Neo 2's automatic exposure constantly adjusts as the frame composition changes. For consistent monitoring footage, lock exposure manually before beginning documentation sequences.
Neglecting compass interference: Mountain terrain often contains iron deposits that affect compass calibration. Recalibrate at each new launch location, not just once per day.
Underestimating battery temperature effects: Cold mountain temperatures reduce battery voltage. Warm batteries to 20°C minimum before flight. Keep spares in an insulated bag against your body.
Flying without visual observers: Mountain terrain creates blind spots. Station observers at key positions to maintain visual line of sight compliance and provide early warning of approaching aircraft or weather.
Frequently Asked Questions
Can the Neo 2 handle mountain wind conditions reliably?
The Neo 2 maintains stable flight in winds up to 10.7 m/s (Level 5). Mountain operations regularly encounter gusts exceeding this threshold. Monitor real-time wind data and establish personal minimums based on your risk tolerance. Most experienced operators limit mountain flights to sustained winds under 8 m/s with gusts under 12 m/s.
How does ActiveTrack perform when subjects move behind obstacles?
ActiveTrack 3.0 uses predictive algorithms to anticipate subject reemergence when temporary occlusion occurs. The system maintains tracking for obstacles blocking the subject for up to 3 seconds. Longer occlusions require manual reacquisition. Position the drone to minimize obstacle interference when tracking is critical.
What's the optimal monitoring altitude for mountain venues?
Altitude selection balances coverage area against detail resolution. For general venue monitoring, 40-60 meters AGL (above ground level) provides optimal balance. Security-focused operations requiring facial recognition or license plate capture require 15-25 meters AGL. Always maintain legal altitude limits and respect privacy considerations.
Start Monitoring Smarter
Mountain venue monitoring demands equipment that handles challenging conditions while delivering professional results. The Neo 2, properly configured with the right accessories and techniques, meets that standard.
The combination of reliable obstacle avoidance, intelligent subject tracking, and professional color science creates a monitoring platform that punches well above its weight class.
Ready for your own Neo 2? Contact our team for expert consultation.