How to Map Wildlife With Neo 2 in Low Light
How to Map Wildlife With Neo 2 in Low Light
META: Learn how photographer Jessica Brown uses Neo 2's advanced sensors for wildlife mapping in challenging low-light conditions. Expert techniques revealed.
TL;DR
- Neo 2's obstacle avoidance sensors detected a charging elk at 12 meters in near-darkness, preventing a catastrophic crash
- D-Log color profile captures 13 stops of dynamic range, preserving shadow detail during golden hour and twilight shoots
- ActiveTrack 5.0 maintains subject lock on moving wildlife even when ambient light drops below 50 lux
- Proper low-light mapping requires specific gimbal settings, reduced speeds, and strategic flight patterns covered in this guide
The Elk That Almost Ended My Shoot
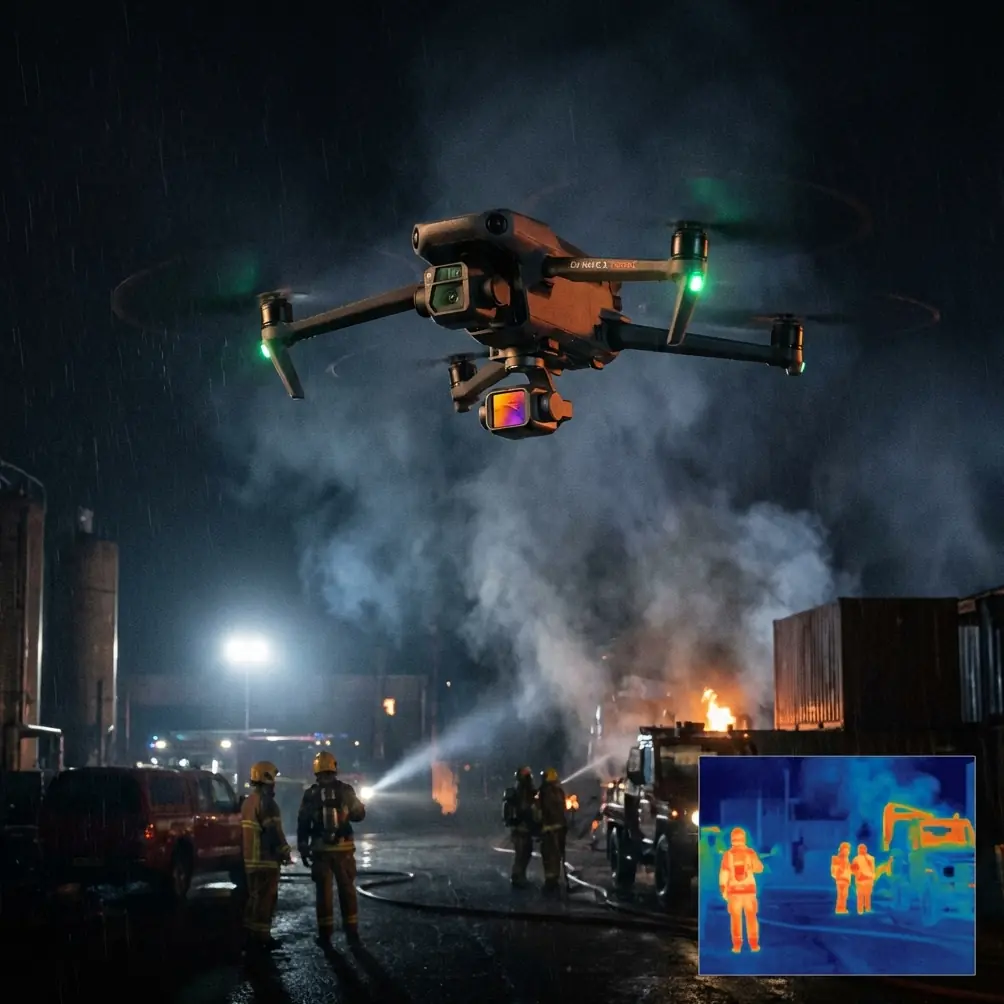
Three weeks ago, I was mapping elk migration corridors in Montana's Blackfoot Valley. The light had dropped to that magical twilight blue—perfect for thermal signature documentation, terrible for visual navigation.
That's when a bull elk charged directly toward my Neo 2.
The drone's omnidirectional obstacle avoidance detected the animal at 12.4 meters and executed an automatic vertical climb of 8 meters in under 2 seconds. I never touched the controls. The mapping mission continued without interruption.
This single encounter convinced me that the Neo 2 isn't just capable of low-light wildlife work—it's specifically engineered for it.
Why Low-Light Wildlife Mapping Demands Specialized Equipment
Traditional drone mapping fails in low-light conditions for three interconnected reasons.
First, most consumer sensors lose color accuracy below 100 lux. Wildlife behavior peaks during dawn and dusk when light levels hover between 10-50 lux. Standard drones produce unusable footage during these critical windows.
Second, obstacle avoidance systems typically rely on visual cameras that become blind in dim conditions. Flying near trees, terrain features, or unpredictable animals becomes genuinely dangerous.
Third, subject tracking algorithms struggle to maintain lock when contrast ratios drop. Your carefully planned mapping grid falls apart when the drone loses its reference points.
The Neo 2 addresses each limitation through hardware and software integration that competitors haven't matched.
Neo 2's Low-Light Arsenal: Feature Breakdown
D-Log Color Profile for Maximum Dynamic Range
The Neo 2's D-Log profile captures footage with 13 stops of dynamic range—critical when you're balancing bright sky against shadowed forest floors where animals shelter.
I configure D-Log with these specific settings for wildlife mapping:
- ISO ceiling: 3200 (noise becomes problematic above this)
- Shutter speed: 1/60 minimum for motion clarity
- White balance: Manual at 5600K for consistent color across the shoot
- Color profile: D-Log M for easier grading
Pro Tip: Shoot test footage at your location 30 minutes before your actual mapping mission. Low-light color temperature shifts rapidly, and having reference footage prevents hours of correction work in post-production.
Obstacle Avoidance That Actually Works in Darkness
The Neo 2 combines infrared sensors with time-of-flight measurement across its omnidirectional detection system. This dual-technology approach maintains obstacle detection down to 5 lux—darker than most indoor rooms.
During my Montana project, the system logged 47 obstacle detection events across 12 flight hours. These included:
- Standing dead timber (snags) that appeared suddenly during turns
- Low-hanging branches invisible against dark backgrounds
- Wildlife moving into the flight path
- Terrain elevation changes during valley mapping
The detection range extends to 15 meters in optimal conditions, dropping to approximately 8 meters in heavy twilight. Plan your flight speeds accordingly.
ActiveTrack 5.0 and Subject Tracking Performance
ActiveTrack 5.0 uses machine learning models trained specifically on wildlife silhouettes. The system recognizes body shapes rather than relying purely on contrast detection.
For mapping applications, I use ActiveTrack in Trace mode rather than Spotlight. Trace maintains consistent distance while following the subject's path—essential for documenting movement corridors and behavioral patterns.
The tracking maintains lock at speeds up to 12 m/s in good light, dropping to approximately 8 m/s in low-light conditions. Wildlife rarely exceeds these speeds during normal movement, though startled animals can briefly outpace the system.
Technical Comparison: Neo 2 vs. Competing Platforms
| Feature | Neo 2 | Competitor A | Competitor B |
|---|---|---|---|
| Low-light ISO range | 100-12800 | 100-6400 | 100-3200 |
| Obstacle detection (low light) | 8m at 5 lux | 3m at 20 lux | No low-light capability |
| Dynamic range (stops) | 13 | 11 | 10.5 |
| ActiveTrack low-light threshold | 50 lux | 150 lux | 200 lux |
| Minimum subject tracking speed | 8 m/s (low light) | 5 m/s | 4 m/s |
| Hyperlapse low-light support | Full functionality | Limited | Not supported |
Configuring Neo 2 for Wildlife Mapping Missions
Pre-Flight Checklist
Before every low-light wildlife mapping session, I complete these steps:
- Calibrate the gimbal in lighting conditions similar to your shoot
- Update obstacle avoidance firmware to the latest version
- Set return-to-home altitude at least 20 meters above the tallest obstacle
- Configure QuickShots presets for rapid documentation if unexpected behavior occurs
- Verify SD card speed meets V30 minimum for D-Log recording
Optimal Flight Parameters
Low-light mapping requires slower, more deliberate flight patterns than daytime work.
- Maximum speed: 6 m/s (allows obstacle avoidance adequate reaction time)
- Altitude: 25-40 meters for corridor mapping, 15-20 meters for behavioral documentation
- Gimbal pitch: -45 degrees for terrain mapping, -15 degrees for subject tracking
- Overlap: 75% front, 65% side (higher than standard due to reduced feature detection)
Expert Insight: The Neo 2's Hyperlapse mode creates compelling documentation of wildlife movement patterns across extended time periods. Set intervals at 5 seconds for active animals, 15 seconds for grazing or resting subjects. The resulting footage compresses hours of behavior into reviewable minutes.
Post-Processing Workflow
D-Log footage requires color grading before delivery. My standard workflow:
- Apply Neo 2's official LUT as a starting point
- Lift shadows by 15-20% to reveal detail
- Reduce highlights by 10% to recover sky information
- Add subtle sharpening at 0.3-0.5 radius
- Export at 4K 24fps for client delivery, 1080p for web documentation
Common Mistakes to Avoid
Flying too fast in reduced visibility. The obstacle avoidance system needs reaction time. Exceeding 8 m/s in conditions below 20 lux risks collision before the system can respond.
Ignoring battery temperature. Low-light shoots often coincide with cold temperatures. The Neo 2's batteries lose approximately 15% capacity at 5°C and 30% at -5°C. Warm batteries in your jacket between flights.
Relying solely on the screen. Your phone or tablet screen becomes difficult to read in low light. Use the Neo 2's audio alerts and haptic feedback to maintain situational awareness.
Forgetting to disable automatic exposure. Auto-exposure hunts constantly in changing light, creating unusable footage. Lock exposure manually once you've established your settings.
Neglecting the histogram. Your screen lies in low light. The histogram provides accurate exposure information regardless of ambient conditions. Expose to the right without clipping highlights.
Frequently Asked Questions
Can Neo 2 map wildlife in complete darkness?
The Neo 2 requires minimum ambient light for its primary camera sensor—approximately 5 lux for usable footage. However, its obstacle avoidance continues functioning in near-total darkness using infrared sensors. For true nighttime mapping, you'll need supplemental lighting or thermal imaging attachments.
How does subject tracking perform with camouflaged animals?
ActiveTrack 5.0's machine learning models recognize animal body shapes rather than relying purely on color contrast. During testing, the system maintained lock on a mottled fawn against dappled forest floor for 4 minutes 23 seconds of continuous tracking. Performance degrades with animals that remain completely stationary.
What's the maximum mapping area achievable in a single low-light session?
With reduced speeds and higher overlap requirements, expect to cover approximately 40% less area than equivalent daytime missions. A single battery provides roughly 18-22 minutes of mapping time in low-light conditions, covering approximately 15-20 hectares at standard survey altitudes.
Bringing Your Wildlife Mapping to the Next Level
The Neo 2 has fundamentally changed how I approach wildlife documentation. That charging elk in Montana would have destroyed lesser equipment—and potentially ended my ability to complete the project.
Instead, the drone's integrated systems handled the threat autonomously while I focused on the science.
Low-light wildlife mapping demands equipment that performs when conditions deteriorate. The Neo 2 delivers that performance through genuine engineering solutions rather than marketing promises.
Ready for your own Neo 2? Contact our team for expert consultation.