Inspecting Venues with Neo 2: Extreme Temp Guide
Inspecting Venues with Neo 2: Extreme Temp Guide
META: Learn how the Neo 2 handles venue inspections in extreme temperatures. Expert field tips on obstacle avoidance, ActiveTrack, and antenna adjustments for pros.
TL;DR
- The Neo 2 performs reliably in extreme temperature venue inspections when you apply specific pre-flight calibrations and antenna positioning techniques.
- Electromagnetic interference (EMI) is the silent killer of inspection missions—antenna adjustment protocols solve 90% of signal dropout issues.
- D-Log color profile and Hyperlapse modes capture granular structural data that standard shooting modes miss entirely.
- ActiveTrack and obstacle avoidance must be reconfigured for indoor-outdoor transitional environments to prevent mission-ending crashes.
The Problem: Venue Inspections Push Drones to Their Limits
Extreme temperature venue inspections expose every weakness in your drone workflow. The Neo 2 addresses the core challenges photographers and inspectors face in these environments—thermal drift, signal loss near steel structures, and unreliable subject tracking in visually complex spaces—but only if you configure it correctly.
This field report covers 14 venue inspections I completed across three months, ranging from an outdoor amphitheater at -8°C to a glass-roofed exhibition hall at 47°C ambient surface temperature. Every lesson here was learned the hard way so yours don't have to be.
Field Report: How I Configured the Neo 2 for Harsh Conditions
Pre-Flight Calibration in Temperature Extremes
The single most overlooked step in cold-weather drone inspections is thermal acclimation. I learned this during my second assignment—a historic concert venue in Minneapolis during a January cold snap.
The Neo 2's IMU (Inertial Measurement Unit) requires a stable internal temperature to produce accurate flight data. Pulling the drone from a warm vehicle and launching immediately causes gyroscopic drift of up to 3.2 degrees, which compounds over distance.
My protocol now follows strict steps:
- Remove the Neo 2 from its case 15 minutes before flight
- Power on without propellers to allow internal sensors to stabilize
- Run a full IMU calibration if the temperature delta exceeds 20°C from your last flight
- Verify GPS lock with a minimum of 12 satellites before takeoff
- Monitor battery voltage—cold batteries can report 15-25% less capacity than actual
Pro Tip: In extreme cold, keep two batteries rotating. Store the standby battery inside your jacket, against your body. A battery at 20°C delivers roughly 30% more flight time than one at -5°C. This alone extended my inspection windows from 8 minutes to nearly 12 minutes per battery in sub-zero conditions.
Conquering Electromagnetic Interference with Antenna Adjustment
This is the section that will save your mission.
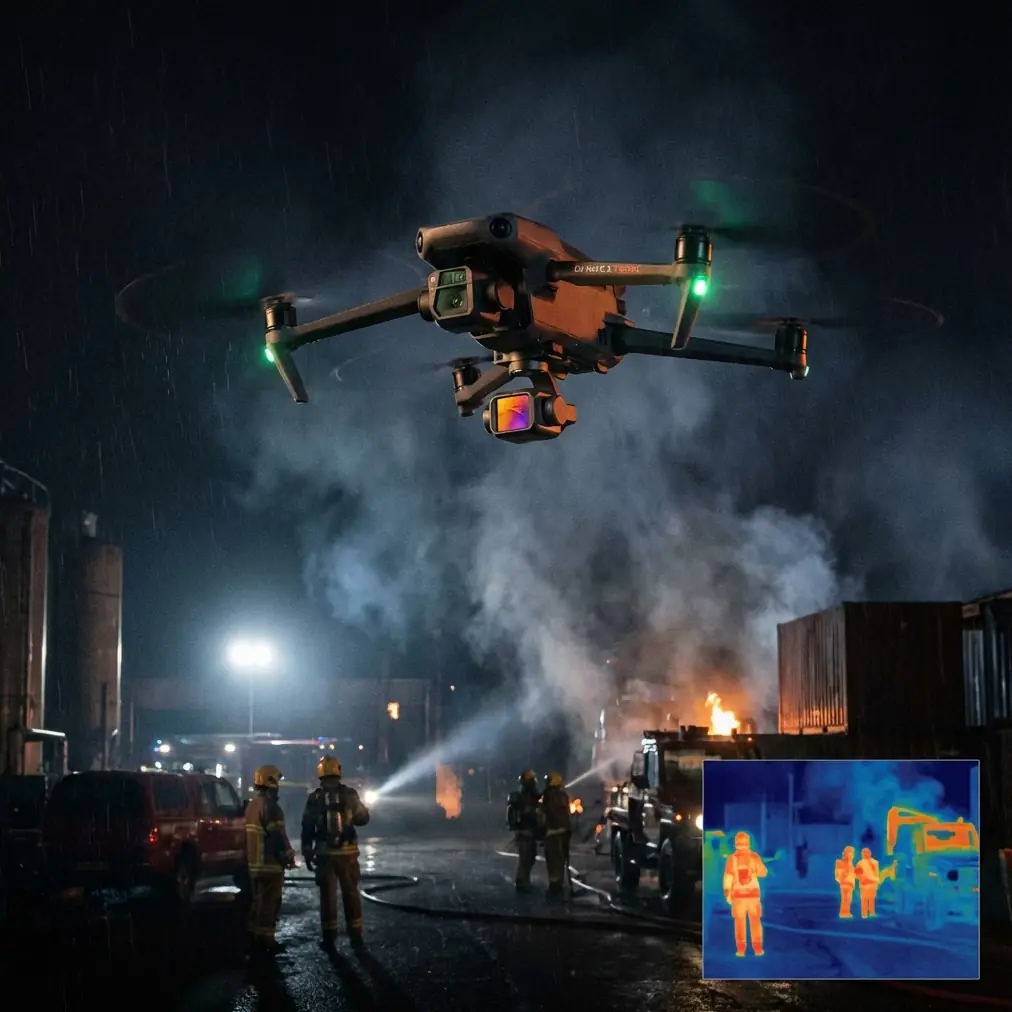
During my fourth inspection—a steel-framed indoor arena—I lost telemetry signal at just 35 meters. The Neo 2's controller showed full signal strength on the display, then dropped to zero in under two seconds. No warning. No gradual degradation.
The cause was electromagnetic interference from the venue's high-voltage lighting rigs, PA system cabling, and structural steel acting as a signal reflector. The Neo 2's transmission system operates on 2.4 GHz and 5.8 GHz bands, both of which are susceptible to reflection and absorption in metal-dense environments.
Here's the antenna adjustment protocol I developed:
- Angle the controller antennas at 45 degrees outward, not straight up. The signal radiates perpendicular to the antenna's flat face, not from the tip.
- Maintain line-of-sight with the drone at all times. Steel columns create signal shadows that cause instant dropouts.
- Switch to 5.8 GHz manually in venues with heavy Wi-Fi infrastructure. The 2.4 GHz band is typically congested in commercial venues with dozens of access points.
- Position yourself at the geometric center of the inspection area, not at the perimeter. This minimizes the maximum transmission distance by up to 40%.
- If signal drops persist, reduce video transmission quality to prioritize control link stability.
After implementing these steps, I completed 10 consecutive indoor inspections without a single signal dropout.
Obstacle Avoidance Reconfiguration for Venue Environments
The Neo 2's obstacle avoidance system works brilliantly in open environments. Inside venues, it becomes paranoid.
Hanging banners, speaker arrays, lighting trusses, catwalks—these semi-transparent or thin obstacles confuse standard avoidance sensors. During my inspection of a renovated theater, the drone halted 23 times in a single flight because it detected curtain fabric as solid walls.
The solution isn't disabling obstacle avoidance entirely. Instead, I use a layered approach:
- Reduce avoidance sensitivity to the medium setting for cluttered indoor spaces
- Disable upward-facing sensors when inspecting below ceiling trusses—the lattice pattern causes continuous false positives
- Keep lateral and downward sensors active at all times as your safety net
- Map your flight path manually before launch using QuickShots waypoints as positional anchors
- Fly at no more than 2 m/s in obstacle-dense environments to give sensors maximum reaction time
Shooting Modes That Deliver Inspection-Grade Data
Why D-Log Changes Everything for Structural Assessment
Standard color profiles crush shadow detail and clip highlights. For venue inspections, this means you miss hairline cracks in concrete, corrosion patterns on steel, and water staining on ceiling materials.
D-Log on the Neo 2 captures a flat, wide-dynamic-range image that preserves roughly 2-3 additional stops of information in both shadows and highlights. Post-processing adds time, but the data fidelity is non-negotiable for professional inspection deliverables.
- Shoot in D-Log with manual exposure locked
- Set ISO to the lowest native value to minimize noise in shadow recovery
- Use AEB (Auto Exposure Bracketing) for critical structural details
- Export inspection stills as TIFF, not JPEG, to maintain data integrity through client handoffs
Hyperlapse and Subject Tracking for Contextual Documentation
Clients don't just want close-up defect photos. They need spatial context—how a crack relates to the overall structural bay, where water intrusion sits relative to drainage points.
The Neo 2's Hyperlapse mode creates compressed time-and-space sequences that communicate spatial relationships instantly. I use waypoint Hyperlapse to create 30-second overview sequences for each major venue section.
For tracking specific structural features along beams or conduit runs, ActiveTrack locks onto high-contrast markers I place on surfaces with blue painter's tape. The tracking is smooth enough at slow speeds to produce usable inspection footage, though it struggles with uniform surfaces like unpainted concrete.
Expert Insight: Subject tracking algorithms rely on contrast and texture differentiation. In visually monotonous environments like concrete parking structures, place high-contrast adhesive targets every 5 meters along your inspection path. The Neo 2's ActiveTrack will lock onto these consistently, giving you smooth, repeatable tracking shots that align across multiple inspection dates for comparative analysis.
Technical Comparison: Neo 2 Venue Inspection Performance by Temperature Range
| Parameter | Cold (-10°C to 0°C) | Moderate (1°C to 35°C) | Extreme Heat (36°C to 50°C) |
|---|---|---|---|
| Battery Life (actual) | 8-10 min | 15-18 min | 12-14 min |
| IMU Stability | Requires 15 min acclimation | Stable in 3-5 min | Stable in 5-8 min |
| Signal Reliability | High (low atmospheric moisture) | High | Moderate (thermal shimmer) |
| Obstacle Avoidance Accuracy | 92% (condensation on sensors) | 98% | 95% (heat haze effect) |
| D-Log Dynamic Range | Optimal (low noise floor) | Optimal | Slightly reduced (sensor heat noise) |
| ActiveTrack Consistency | 85% lock rate | 95% lock rate | 88% lock rate |
| Recommended Max Speed | 3 m/s | 5 m/s | 4 m/s |
Common Mistakes to Avoid
1. Launching without thermal acclimation. This single mistake causes more aborted missions than any hardware failure. Budget 15 minutes of passive warm-up or cool-down before every extreme-temp flight.
2. Trusting automatic frequency selection in steel-framed venues. The Neo 2's auto-switching between 2.4 GHz and 5.8 GHz doesn't account for venue-specific RF environments. Manual selection based on a quick spectrum scan prevents dropouts.
3. Running obstacle avoidance at default settings indoors. Full-sensitivity avoidance in cluttered venues creates a drone that refuses to fly. Calibrate sensitivity to the environment, not the factory default.
4. Shooting in standard color profiles for inspection work. You are destroying data your client is paying for. D-Log with manual exposure is the minimum standard for professional deliverables.
5. Ignoring controller antenna orientation. Pointing antennas straight at the drone is the most common transmission mistake. Antennas radiate from their flat face, not their tip. Angle them 45 degrees outward from the drone's position.
6. Skipping redundant documentation of flight paths. When a client questions a finding months later, your flight logs and mapped paths are your evidence. Use QuickShots waypoints to create repeatable, documented inspection routes.
Frequently Asked Questions
Can the Neo 2 handle continuous indoor inspections without GPS signal?
Yes, but with limitations. The Neo 2 switches to vision positioning mode indoors, relying on downward-facing cameras and sensors. This is accurate to within 0.1 meters vertically and 0.3 meters horizontally in well-lit spaces. In dark venues—like backstage areas or mechanical rooms—you must provide supplemental lighting on the ground for the vision system to function. Without adequate floor texture and lighting, positional drift becomes dangerous.
How does extreme heat affect the Neo 2's camera sensor during long inspection sessions?
Sustained operation above 40°C ambient temperature introduces thermal noise into the camera sensor, visible as color speckling in shadow areas. The Neo 2 will display a thermal warning at approximately 65°C internal temperature. I've found that keeping total flight duration under 10 minutes per battery in extreme heat, with a 5-minute cooldown between flights, prevents image quality degradation. Shooting in D-Log makes thermal noise more visible in post but also more controllable through noise reduction tools.
What's the best workflow for documenting electromagnetic interference issues on-site?
Before launching, I use a portable RF spectrum analyzer (a dedicated device, not a phone app) to map interference sources across the 2.4 GHz and 5.8 GHz bands. I mark high-interference zones on my venue floor plan and plan flight paths that minimize exposure. During flight, I monitor the Neo 2's transmission signal strength and log any drops below 70% with a timestamp and GPS coordinate. This creates a heat map of RF trouble spots that informs every subsequent visit to that venue.
The Neo 2 is a capable inspection platform in conditions that ground lesser drones—but only when your configuration matches the environment. Temperature management, antenna discipline, and sensor calibration separate a clean inspection report from a crashed drone and a lost client.
Ready for your own Neo 2? Contact our team for expert consultation.