Neo 2 for Coastal Construction Delivery: A Practical Flight
Neo 2 for Coastal Construction Delivery: A Practical Flight Workflow Built Around Air-Ground Photogrammetry
META: Learn how to use Neo 2 on coastal construction sites with a practical delivery and imaging workflow, including flight altitude guidance, obstacle awareness, subject tracking, and why air-ground photogrammetry matters.
Coastal construction is unforgiving on workflow.
Salt haze softens contrast. Wind shifts fast between open shoreline and partially enclosed structures. Reflective surfaces confuse depth perception. And when a site team needs a delivery or visual update, they usually need it tied to something measurable, not just something that looks good on a screen.
That is where a Neo 2 workflow becomes much more useful if you think beyond a simple point-to-point flight.
The more mature model is air-ground integration: using the drone not only to move a lightweight payload or capture site visuals, but to feed a larger photogrammetry process that supports planning, progress checks, and communication across the jobsite. One of the strongest ideas in the reference material is exactly this full-process approach. Wuhan TianJiHang positions its work around an “air-ground integrated photogrammetry” solution, not isolated flying, and that distinction matters on a coastal build. A drone mission is rarely just a mission. It is one layer in a chain that includes image collection, model generation, data organization, and site interpretation.
For a Neo 2 operator delivering to a coastal construction site, that mindset changes how you plan every takeoff.
Why coastal delivery flights need more than basic piloting
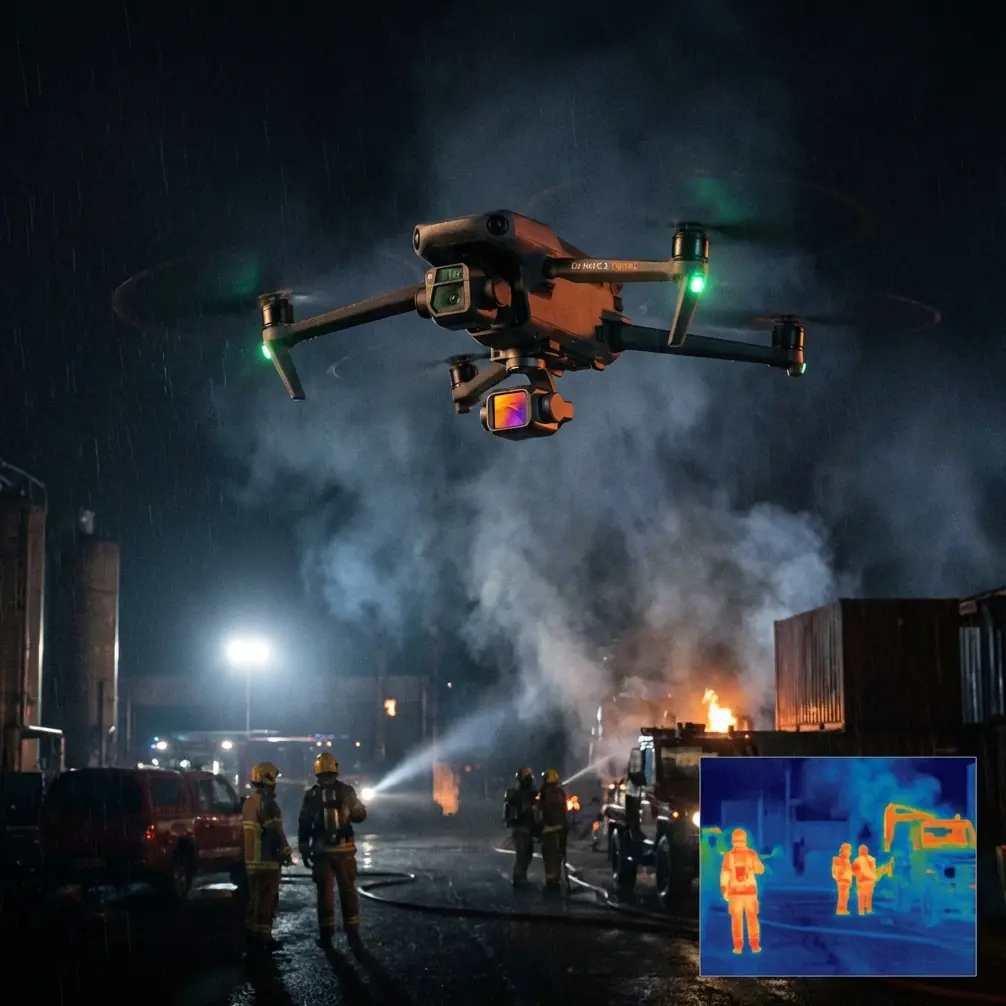
On an inland site, the biggest variables are often cranes, rebar forests, and changing vehicle routes. On a coastal project, add crosswinds, sea spray, sand, corrosion risk, and bright glare coming off water and concrete. You may still be delivering small tools, documents, sample components, or emergency consumables to a rooftop or a partially isolated zone, but safe execution depends on understanding the site as a 3D environment.
This is why the reference document’s emphasis on a full photogrammetry pipeline has operational value. It mentions capabilities spanning air-ground, indoor-outdoor, and even above-below integrated real-scene 3D solutions. For construction, that means you are not forced to treat the Neo 2 as a standalone gadget. You can use it as the airborne front end of a site intelligence loop:
- fly the route,
- collect visual data,
- organize large photo sets,
- build terrain and structure context,
- then refine future delivery corridors.
That is a smarter way to work in coastal conditions, where the “shortest route” is not always the safest one.
The most useful flight altitude insight for coastal construction delivery
If I had to give one practical altitude rule for Neo 2 on a coastal construction site, it would be this:
For initial route validation, start around 25 to 35 meters above local takeoff level, then adjust based on crane height, facade protrusions, and wind behavior near the drop zone.
That range is often a sweet spot for first-pass site understanding. It is usually high enough to clear low temporary obstacles, get stable visual context, and avoid the chaotic rotor wash interactions that can happen too close to walls and scaffold wraps. At the same time, it is low enough to preserve detail for obstacle awareness and route judgment, especially when you are working around partially completed structures.
Why not simply go higher?
Because coastal construction sites often create layered wind behavior. At greater height, winds can become smoother but stronger. Closer to buildings, they can become weaker overall but more turbulent and unpredictable due to edge effects, updrafts, and funneling between structures. Starting at 25 to 35 meters gives you a workable reconnaissance layer where you can watch how the Neo 2 behaves before committing to the delivery leg.
Then refine:
- If the site has tower cranes or concrete cores, move to an altitude that gives you a comfortable vertical buffer above their active swing envelope.
- If the drop area sits under partial structural cover, descend only after a clean visual confirmation pass.
- If waterline winds are pushing inland, expect drift changes as the drone transitions from open air to building shelter.
This is where obstacle avoidance earns its keep, but do not treat it as a substitute for route design. On coastal sites, thin wires, netting, and reflective edges can still demand manual caution.
A tutorial-style Neo 2 workflow that actually fits this scenario
Let’s build the mission the way an experienced operator would.
1. Start with a photogrammetry-first site understanding pass
Before the first delivery run of the day, use Neo 2 to capture a short mapping-style orbit or grid over the active zone. The reference material highlights a full-process solution involving automated modeling, fine modeling, and large-scale photo management and dispatch. That matters because even a modest visual collection flight can reveal route changes that yesterday’s memory will miss.
What you are looking for:
- new scaffolding
- suspended loads
- temporary roof barriers
- fresh excavation edges
- changed material stacks
- mobile equipment repositioning
- access changes at landing points
If your workflow includes D-Log capture for grading flexibility, this is a good moment to use it. Coastal light can be brutal at midday. D-Log can help hold detail in bright concrete and shadowed structural recesses, which makes visual review more useful later. The value is not cinematic flair. It is interpretability.
2. Use the imagery to define a real route, not an assumed one
The source describes a company built around image value-added services and sector solutions for planning, construction monitoring, transport, power, and land management. Construction monitoring is the clue here. A delivery mission should borrow from monitoring discipline.
After your recon pass, define:
- launch point
- climb corridor
- cruise corridor
- transition point into the sheltered site zone
- descent path
- hover verification point
- abort path back to open air
This is where air-ground integration becomes more than a phrase. Ground teams should validate the route from below. The pilot sees one geometry; workers see another. A route that looks open from above may be awkward because of hanging mesh, temporary piping, or newly installed steel.
3. Use ActiveTrack and subject tracking selectively
The user context mentions subject tracking and ActiveTrack, and yes, they can help on a coastal site, but only in specific phases.
If a receiving crew member is moving from one safe receiving area to another, subject tracking can assist in maintaining visual contact while you reposition. That can save time during a live site handoff. Still, tracking should support pilot awareness, not replace it. Construction zones are too dynamic for fully passive dependence.
A better use case is this: track the receiving supervisor during the final coordination stage while maintaining a safe standoff altitude, then manually complete the approach once the landing or drop zone is confirmed.
This reduces confusion on large sites where radio directions like “bring it to the east slab” are less helpful than they sound.
4. Treat QuickShots and Hyperlapse as documentation tools, not gimmicks
Most operators hear QuickShots and Hyperlapse and immediately think marketing footage. On a coastal construction project, they can be surprisingly practical.
A short automated reveal from the shoreline side can show whether access roads, stockpiles, and lift zones changed after a tide cycle or storm event. A Hyperlapse from a fixed daily position can create a compact record of structural progress and logistics movement. Those clips are useful for stakeholders who do not have time to review dense photogrammetry outputs but still need to understand change.
That fits the reference document’s larger logic: drone data should move into a structured information workflow, not sit as random media on memory cards.
5. Build a drop-zone protocol around wind shadow behavior
Here is a mistake I see often: pilots test hover stability in open space, then assume final approach behavior will be similar near the structure. It will not.
On coastal sites, especially those with exposed edges, the most unstable area can be the boundary between open wind and sheltered air. The Neo 2 may feel settled 20 meters out, then encounter rolling turbulence five meters from the facade or roof deck edge.
A simple approach:
- hover at the verification point
- hold for several seconds
- watch lateral correction behavior
- descend in stages rather than one smooth commitment
- keep a clean escape route back into open air
If the aircraft starts making aggressive corrections, do not force the delivery. Reposition and try a new angle.
6. Organize image sets like a survey team, even for delivery work
One of the most overlooked details in the source is the mention of massive photo management and scheduling. That sounds like back-office software language until you work a complicated site for three weeks.
Then it becomes survival.
Create folders by:
- date
- sector of site
- mission type
- weather window
- delivery zone
- issue observed
This lets you compare changes, defend flight decisions, and support progress reporting. If a route becomes unsafe because of new steelwork or crane staging, you want visual proof, not a vague recollection.
Why the reference company background matters here
The source material is not just about software branding. It gives two signals that are relevant to anyone building a Neo 2 site workflow.
First, the company states that its spatial imaging business architecture draws on the research strengths of Wuhan University and Tongji University. Operationally, that suggests the workflow is grounded in surveying and geospatial rigor, not only visual presentation. For coastal construction, that matters because delivery efficiency improves when route planning is based on spatial understanding.
Second, the company was listed in 2014 on the New Third Board under stock code 831412, and in 2017 it was recognized among China’s high-growth geographic information firms, including a top-20 placement in a “TOP50” industry ranking. For an operator, this is not trivia. It indicates that the methods behind air-ground integrated modeling and post-processing are tied to a serious geospatial ecosystem, one that has been shaped by real commercial demand in construction and infrastructure-facing sectors.
In plain language: there is a reason the workflow emphasis is on full process, not just flying and exporting a few images.
How this improves actual construction delivery performance
When a Neo 2 mission is built around air-ground photogrammetry principles, three things get better.
1. Fewer failed approaches
A current 3D understanding of the site cuts down on last-second reroutes and unstable descents.
2. Better communication with site management
Construction managers respond better to route decisions when they can see visual evidence from the same environment they are managing.
3. More value from every flight
A delivery run can also support progress tracking, safety observation, and documentation if the image capture is structured correctly.
That is the real advantage. You are no longer asking the drone to do one job at a time.
A sample Neo 2 mission profile for a coastal build
Here is a practical template you can adapt:
Preflight
- inspect propellers and airframe for salt residue or fine sand
- confirm receiving point with ground team
- review the previous day’s site imagery
- check wind direction relative to shoreline and building faces
Recon flight
- climb to roughly 25–35 meters
- perform a short perimeter pass
- inspect crane positions, rooftop access, scaffold changes, and facade obstructions
- capture D-Log footage if lighting contrast is severe
Route confirmation
- define primary and abort paths
- mark a hover verification point before the final descent
- coordinate visual hand signals or radio callouts with the receiving crew
Delivery leg
- maintain conservative speed through the transition from open air into structure-influenced air
- use obstacle avoidance as a safety layer, not a primary navigation strategy
- if using ActiveTrack on personnel, disengage before final precision positioning
Post-mission
- log route success or instability points
- store imagery by mission and zone
- compare with prior site state to update the next route
If your site team wants help turning these flights into a repeatable operational procedure, send your route layout or footage through this direct project chat: https://wa.me/85255379740
The bigger lesson for Neo 2 operators
A coastal construction site punishes casual drone habits. If you approach delivery as a simple transport task, you will eventually hit friction: unstable final approaches, unclear routes, poor documentation, and repeated site confusion.
If you approach it as part of an air-ground imaging workflow, the operation becomes more resilient.
That is the strongest takeaway from the reference material. The real value is not just aerial capture. It is the full chain: collect, model, organize, interpret, then fly smarter next time. The mention of automated modeling, refined modeling, and large-volume image management is not abstract platform talk. It maps directly to the everyday realities of construction logistics, especially where terrain, structures, and weather interact as aggressively as they do on the coast.
For Neo 2 users, that means the best flight altitude is never just a number. It is a decision inside a larger system. Start with a smart reconnaissance band around 25 to 35 meters, read the site, adapt to the wind layers, and let every mission improve the one after it.
Ready for your own Neo 2? Contact our team for expert consultation.